
Our health depends on what we eat – and an infant’s health depends on what they are fed. Since they cannot chew yet, they rely on their mothers’ breastmilk or infant formulas. Bottles have a prominent place in the life of any baby who is not exclusively breastfed, and parents need to be sure that bottles and other feeding items for their babies are free of bacteria and other harmful organisms.
Top 4 Best Baby Bottles Sterilizer – Comparison

Why Is It Important To Sterilize Baby Bottles?
Sterilizing bottles, breast pumps, pacifiers, and baby items is important because of the under-developed immune systems of infants. This makes them susceptible to infections and illnesses caused by bacteria and viruses. It is the process of eliminating the presence of harmful microorganisms, which in the end provides more protection against germs, keeping your infant items free from contamination.
Health services around the world recommend that sterilization of infant feeding items should be done until the baby is at least 12 months old, because sterilization can help prevent infections such as diarrhea and vomiting.
Cleaning And Sterilizing Baby Bottles: The How-To’s
Making sure your baby’s bottles and other feeding equipment are germ-free isn’t just about washing them. You have to sterilize the bottle for added protection. Here’s a quick run-down of the top reminders for the three stages of preparing a spotless bottle for your infants:
1. Washing
Before you can sterilize your bottle, you have to wash them, either by hand or using the dishwasher.
If you are washing bottles by hand:
- Wash your hands with soap and water first so that you don’t transfer any germs to the bottles.
- Rinse the bottle under running water first. Try not to set them in the sink, as there may be germs present there that stick to the bottle.
- Wash the bottle in hot, soapy water, using a clean bottle brush. It’s ideal to have a basin specifically for this purpose, that doesn’t get used for any other household washing.
- After scrubbing, let the bottles air dry on a clean dish towel away from dust and dirt.
- The washbasin and bottle brush should be washed clean every couple of days, either by hand or in the dishwasher.
If you are using a dishwasher to wash your bottles, then you can put them in on a hot water cycle. If your dishwasher has a heated drying cycle, that will help kill more germs. Remember to wash your hands before removing the bottles from the dishwasher.
After you’re done cleaning your bottles, you’re ready to sterilize.
2. Sterilizing
Boiling
Boiling is the oldest form of sterilizing. It doesn’t take a big investment in equipment but is quite a process. In general, the parts of bottles are put in a large pot of water and boiled for 5-10 minutes. The downside is that not all bottles are suitable for this method as it also tends to damage teats faster, so you need to check your equipment regularly.
Chemical sterilization
Antibacterial solutions can be used to sterilize your infant items in cold water. These often come in liquid or tablet form and should be used according to the manufacturer’s instructions, both in terms of how to make the solution and how long your bottles must be submerged.
This method is not so good for metal parts as they may be damaged by repeated exposure to chemicals. You also need to make a fresh solution everyday.
Steam sterilization
The steam kills bacteria and other harmful microorganisms. Because of their effectiveness and ease of use, electric sterilizers are very popular among parents. They have to make sure that each bottle and teat is placed properly in the sterilizer, and then set it to go. Electric sterilizers usually turn off automatically or have a light that will indicate when the work is done.
Microwave sterilizers work in a similar way, except they are put in the microwave. Parents must follow the manufacturer’s instructions and use the right power setting, to make sure the bottles don’t melt. This system isn’t suitable for metal components.
3. Storing
The next step is to store your sterilized bottles and teats. Some sterilizers allow you to leave the bottles and teats inside the machine until you need them, ensuring they are completely sanitized. If you do want to remove them, wash and dry your hands before you touch the bottles, or use fresh tongs to handle them. Place the infant items in a clean container and put them in the fridge to keep them germ-free.
Which Baby Bottle Sterilizers Are The Best?
We can all agree that a baby bottle sterilizer eases our lives as parents and caregivers. However, with many baby bottle sterilizers available on the market, all with different features and specifications, shopping for one isn’t straightforward. But, don’t worry: we’ve listed our top picks for baby bottle sterilizers so you can choose which one suits you best.
Philips Avent 3-in-1 Sterilizer
This electric sterilizer not only kills 99.99% of harmful germs, but it also has an adjustable design to help you fit the bottles and accessories flexibly, making it easy for you to organize them. It takes up little counter space and is very convenient.
What’s also great with the Philips Avent 3-in-1 sterilizer is it can fit up to six bottles, with both standard and wide necks, as well as breast pump parts and accessories. It also has a short sterilizing time of only 6 minutes and keeps your baby bottle and teats sterile for 24 hours if the lid remains unopened.
Pros
It is easy to use: you just add water to the base, fill the rack, close the lid, and push the button to start the cycle. It also automatically shuts off when the cycle ends. It doesn’t only fit Avent bottles, it can also fit other bottles due to its adjustable size rack. It’s portable and easy to clean, too.
Cons
You have to be cautious because a lot of steam escapes after the cycle ends, you may get burned.
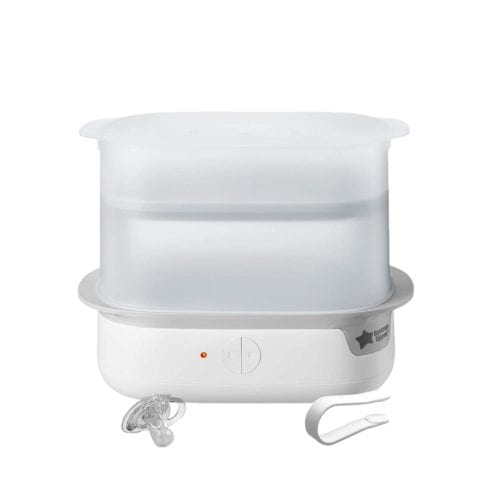
Tommee Tippee Electric Steam Sterilizer
If you’re one of those parents who need everything quick, compact, and secure, this is the bottle sterilizer for you. Tommee Tippee is a trusted brand for infant-related items, and this sterilizer is no exception. It can hold 6 bottles at once, plus a rack for smaller parts, and can be sanitized in as fast as 5 minutes.
Pros
We love that this bottle sterilizer is also counter-friendly and functions with just one touch. Like most sterilizers, its contents are unsoiled for 24 hours and kills 99.9% of harmful bacteria for your little one’s safety. Its space-saving form is perfect for small spaces given its capacity.
Cons
This Tommee Tippee sterilizer is made of plastic, and may produce a powerful smell during use. And since its material is plastic, the insides should also be washed frequently in order to maintain its quality.
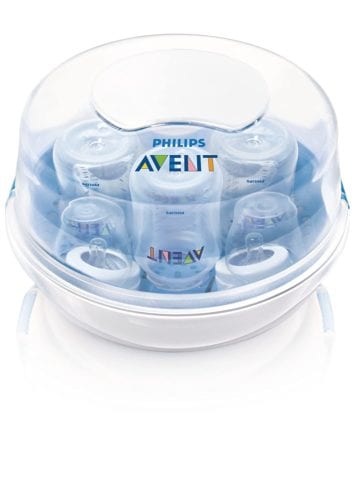
Philips Avent Microwave Steam Sterilizer
Not a fan of electric bottle sterilizers? Then microwave steam sterilizers are for you. Our top pick for this type of bottle sterilizer would be the Philips Avent Microwave Steam Sterilizer. The manufacturer claims it kills 99.99% of microorganisms in a matter of minutes. Its cycle time runs between 2 and 6 minutes depending on your microwave. Even though it’s lightweight, it can fit up to four bottles and accessories and can keep them disinfected for 24 hours if you don’t open the lid.
Pros
Its lightweight size makes it very portable. You can use it at home, or even when you’re away. It’s also made with BPA-free plastic, so you can be sure it’s safe. It takes very little space compared to other bottle sterilizers and is dishwasher-safe. If you’re not using it, you can just store it in the cupboard or in the microwave.
Cons
Despite being portable, the Avent microwave sterilizer is too big for compact microwaves. Also, removing the bottle sterilizer from the microwave can be tricky, since its handle can be quite hard to grasp. If you’re in a full-bottle-feeding household, the capacity of four bottles might not be enough. Lastly, this machine produces a lot of steam, so be careful with opening the lid.
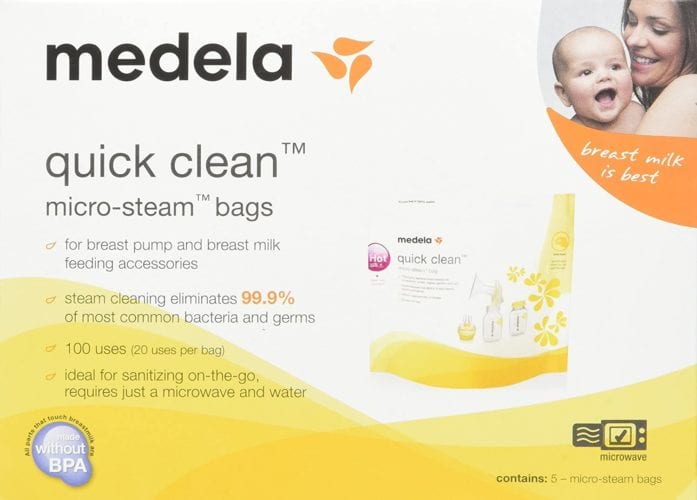
(adsbygoogle = window.adsbygoogle || []).push({});Medela Quick Clean Steam Bags
Now, if you’re a parent who thinks traditional bottle sterilizers are a hassle, then you will love the steam bag from Medela. These bags are quick in disinfecting: they only need 3 minutes in the microwave! They also kill 99.99% of germs and keep your items sterile for 24 hours. They’re not limited to baby bottles: you can also sterilize pacifiers, breast pump, and accessories.
Pros
These steam bags are very affordable and portable. They are very easy to use and no fuss: they only require 2 ounces of water and need three minutes of your time. This makes them great for travel, no need to bring bulky bottle sterilizers which can be a hassle. It also takes up zero counter space which is advantageous if you have limited kitchen space.
Cons
Despite their portability, these steam bags have a limited capacity. If you need to sterilize many bottles and accessories, you may have to make two rounds of sterilization. Also, these bags require microwave access which isn’t always available when you’re away from home.
Baby Brezza One Step Baby Bottle Sterilizer and Dryer
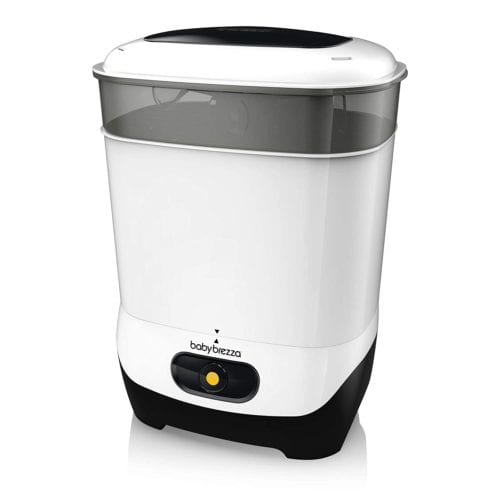
If you’re too conscious of air-drying your baby bottles and accessories, then the Baby Brezza baby bottle sterilizer and dryer is for you. You can choose whether you need it to sterilize, dry, or store the bottles, or all three! It also kills 99.99% of germs and items stay sterile for 24 hours. It sterilizes in 8 minutes and automatically dries in cycles of between 30 and 60 minutes.
Pros
This bottle sterilizer is easy to use: just touch the LCD panel and you’re good to go. It automatically goes into the drying after sterilization and shuts off once it’s done. It also has a large capacity of 6 bottles plus accessories. Lastly, it can sterilize either glass or plastic bottles.
Cons
It has a longer cycle than other bottle sterilizers. It also needs to be filled with distilled water, which is an added cost to its already high price. Lastly, not all types of bottles fit in it, compared to other sterilizers.
Wabi Baby UV Sterilizer and Dryer
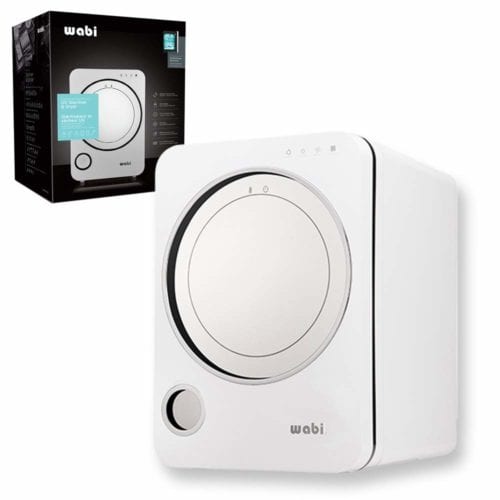
This type of bottle sterilizer uses UV light in order to disinfect the bottle. One of the few sterilizer brands pioneering the use of UV light, Wabi cleans and dries as fast as 30 minutes, with a timer display to keep you on track of the remaining time with each round. It has two UV bulbs and a roomy compartment that can fit up to 11 bottles, and a bottom tray for your kids’ smaller items. This sterilizer also automatically shuts down to conserve energy and assure your little one’s safety.
Pros
Because this product uses UV to sanitize, you can put anything that you want to sterilize and dry inside, including non-infant-related items like your phone, keys, or remote. Never mind baby bottles, this sterilizer is a post-pandemic essential for your everyday items! The UV light provides a mess-free sterilizing method so it saves you from heavy cleaning afterward. This sterilizer only needs wiping with a fresh cloth and its wide door allows easy polishing and access inside. It also has 3 settings: dry setting, UV sterilizer setting, and both.
Cons
One of the heaviest and bulkiest sterilizers on the list, the Wabi sterilizer weighs 15 lbs. and 20 x 16 inches dimensions, which is not suitable for small spaces. Parents also find that it takes a longer time to make the items sterile compared to other sterilizers which can disinfect in less than 10 minutes. And because this is a high-tech one, expect that innovation can be pricey and expensive.
The Final Word
Germ-free baby bottles and accessories greatly affect our babies’ health. As parents, we are given the responsibility to take care of our children’s well-being. Thanks to modern technology, sterilizing baby bottles doesn’t have to be the daily chore that it once was, giving you more time to enjoy your little one, or grab a well-deserved five-minute break!
.wp-block-image.product-image { margin-top: 30px; max-width: 350px; margin-left: auto; margin-right: auto; } .product-image figcaption { text-align: center; margin-bottom: 10px !important; } .wp-block-button.amazon-btn { margin-bottom: 50px; }